University of Navarra (TECNUN) - February 2026
The practicals as well as the take-home project you will be using Flower, an open-source framework for Federated AI. With Flower you can configure and run arbitrarily large federations using either its Simulation Engine or the Deployment Engine. In this course we’ll primarily use the former but we’ll also touch on the Deployment Engine.
Setting up Your Machine
Flower works best on UNIX-based systems like Ubuntu or macOS. If you are on Windows, it is recommended to use PowerShell. For the very best support on Windows make use of WSL to run your Flower apps. With WSL you can also make use of the NVIDIA GPU in your Windows host. You’ll need a recent version of Windows 10 or Windows 11.
In this course you’ll need to use a GPU. If you have a laptop with a modern GPU you are welcome to use it for the practicals and the graded project. If that’s the case, you just need VSCode and Python 3.10/11/12. Then, skip to the section Flower Hello World.
Alternatively, if you don’t have easy access to a GPU or your GPU isn’t powerful enough, you can use a GPU instance via vast.ai. What follows are the instructions for how to configure your VSCode to connect to a remote instance running on vast.ai.
Configuring Vast.ai
- Go to vast.ai and create an account using your
@alumni.unav.esemail. Click on the[SIGN IN]button on the top-right corner. -
First, ensure you have a pair of SSH keys. When prompted for further details, press enter to accept defaults. These will be needed to connect to the remote GPU instance.
# MacOS / Linux (run in terminal) ssh-keygen -t ed25519 -C "[email protected]" # Windows (run in PowerShell) ssh-keygen -t ed25519 -C "[email protected]" - Copy the contents of your public SSH key (e.g.
~/.ssh/id_ed25519.pub) and add it to vast.ai’s SSH Keys tab. See the screenshot below for reference.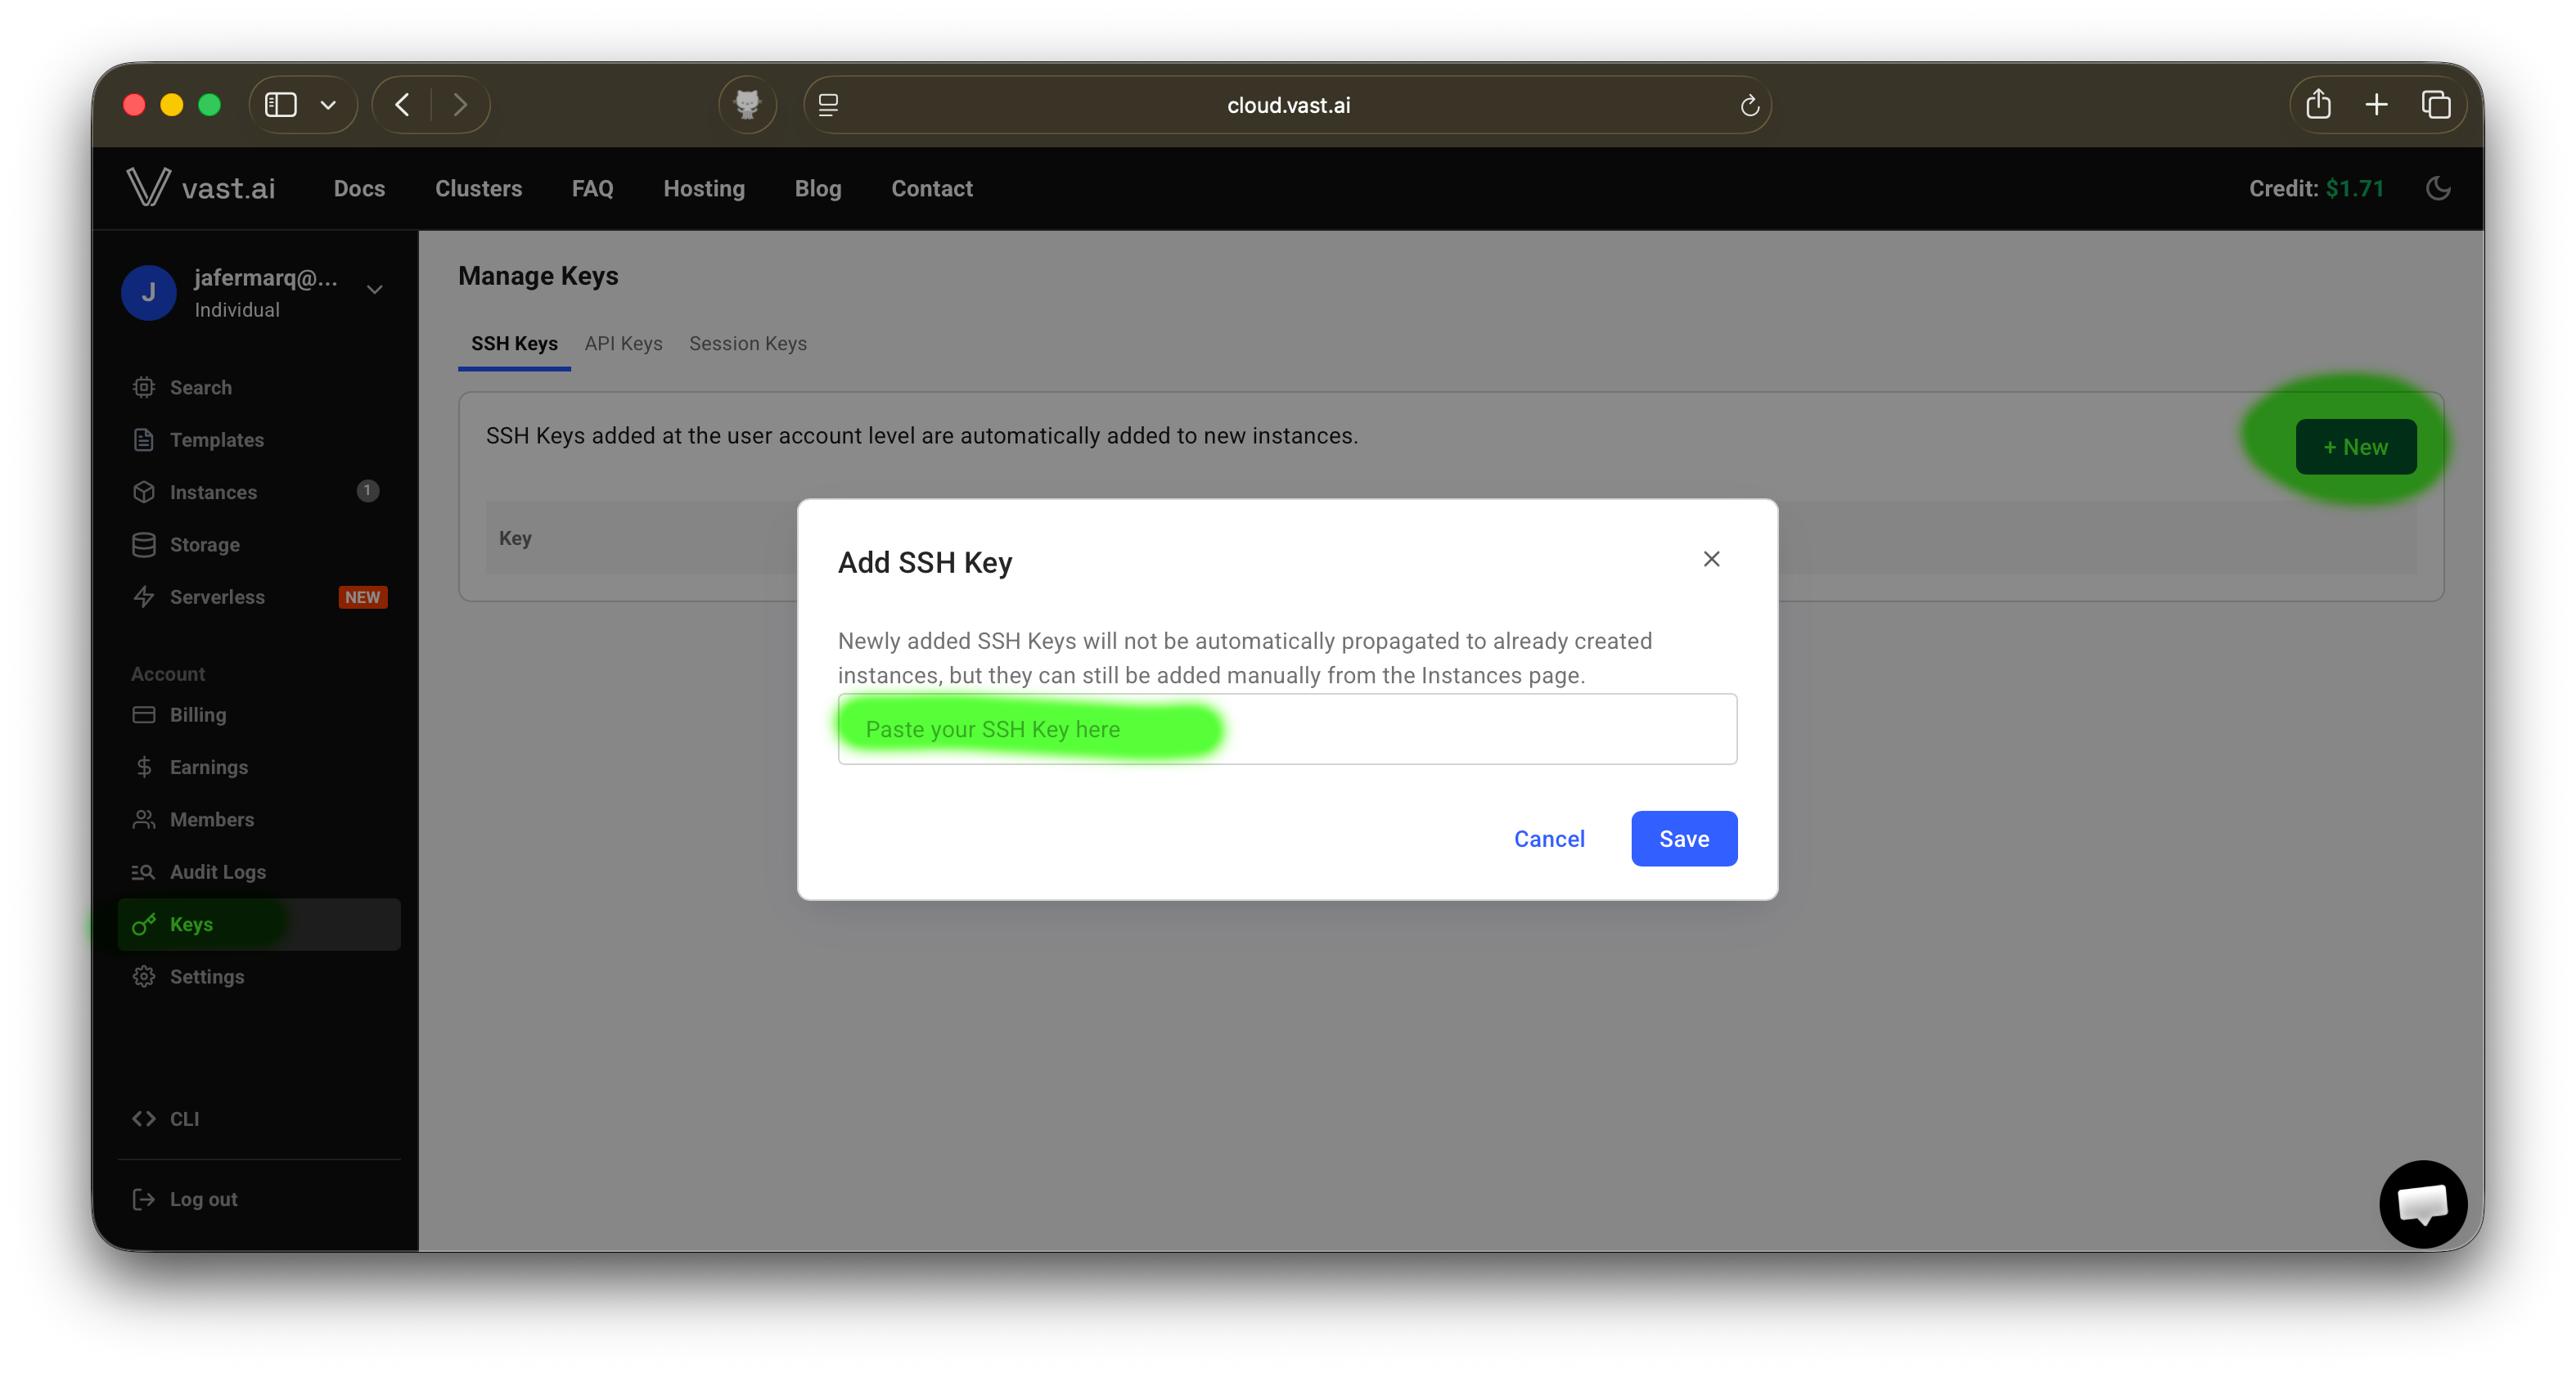
- Send me an email with the email you used to register in the step above. I will transfer $15 in credits to your account. This amount should last for about 100 GPU hours when using an instance with an RTX 3090.
- Use this vast.ai template that comes with Python 3.12, Conda and CUDA 12 pre-installed. You should see the same
PyTorch (Vast)template shown as in the image below under the red shade.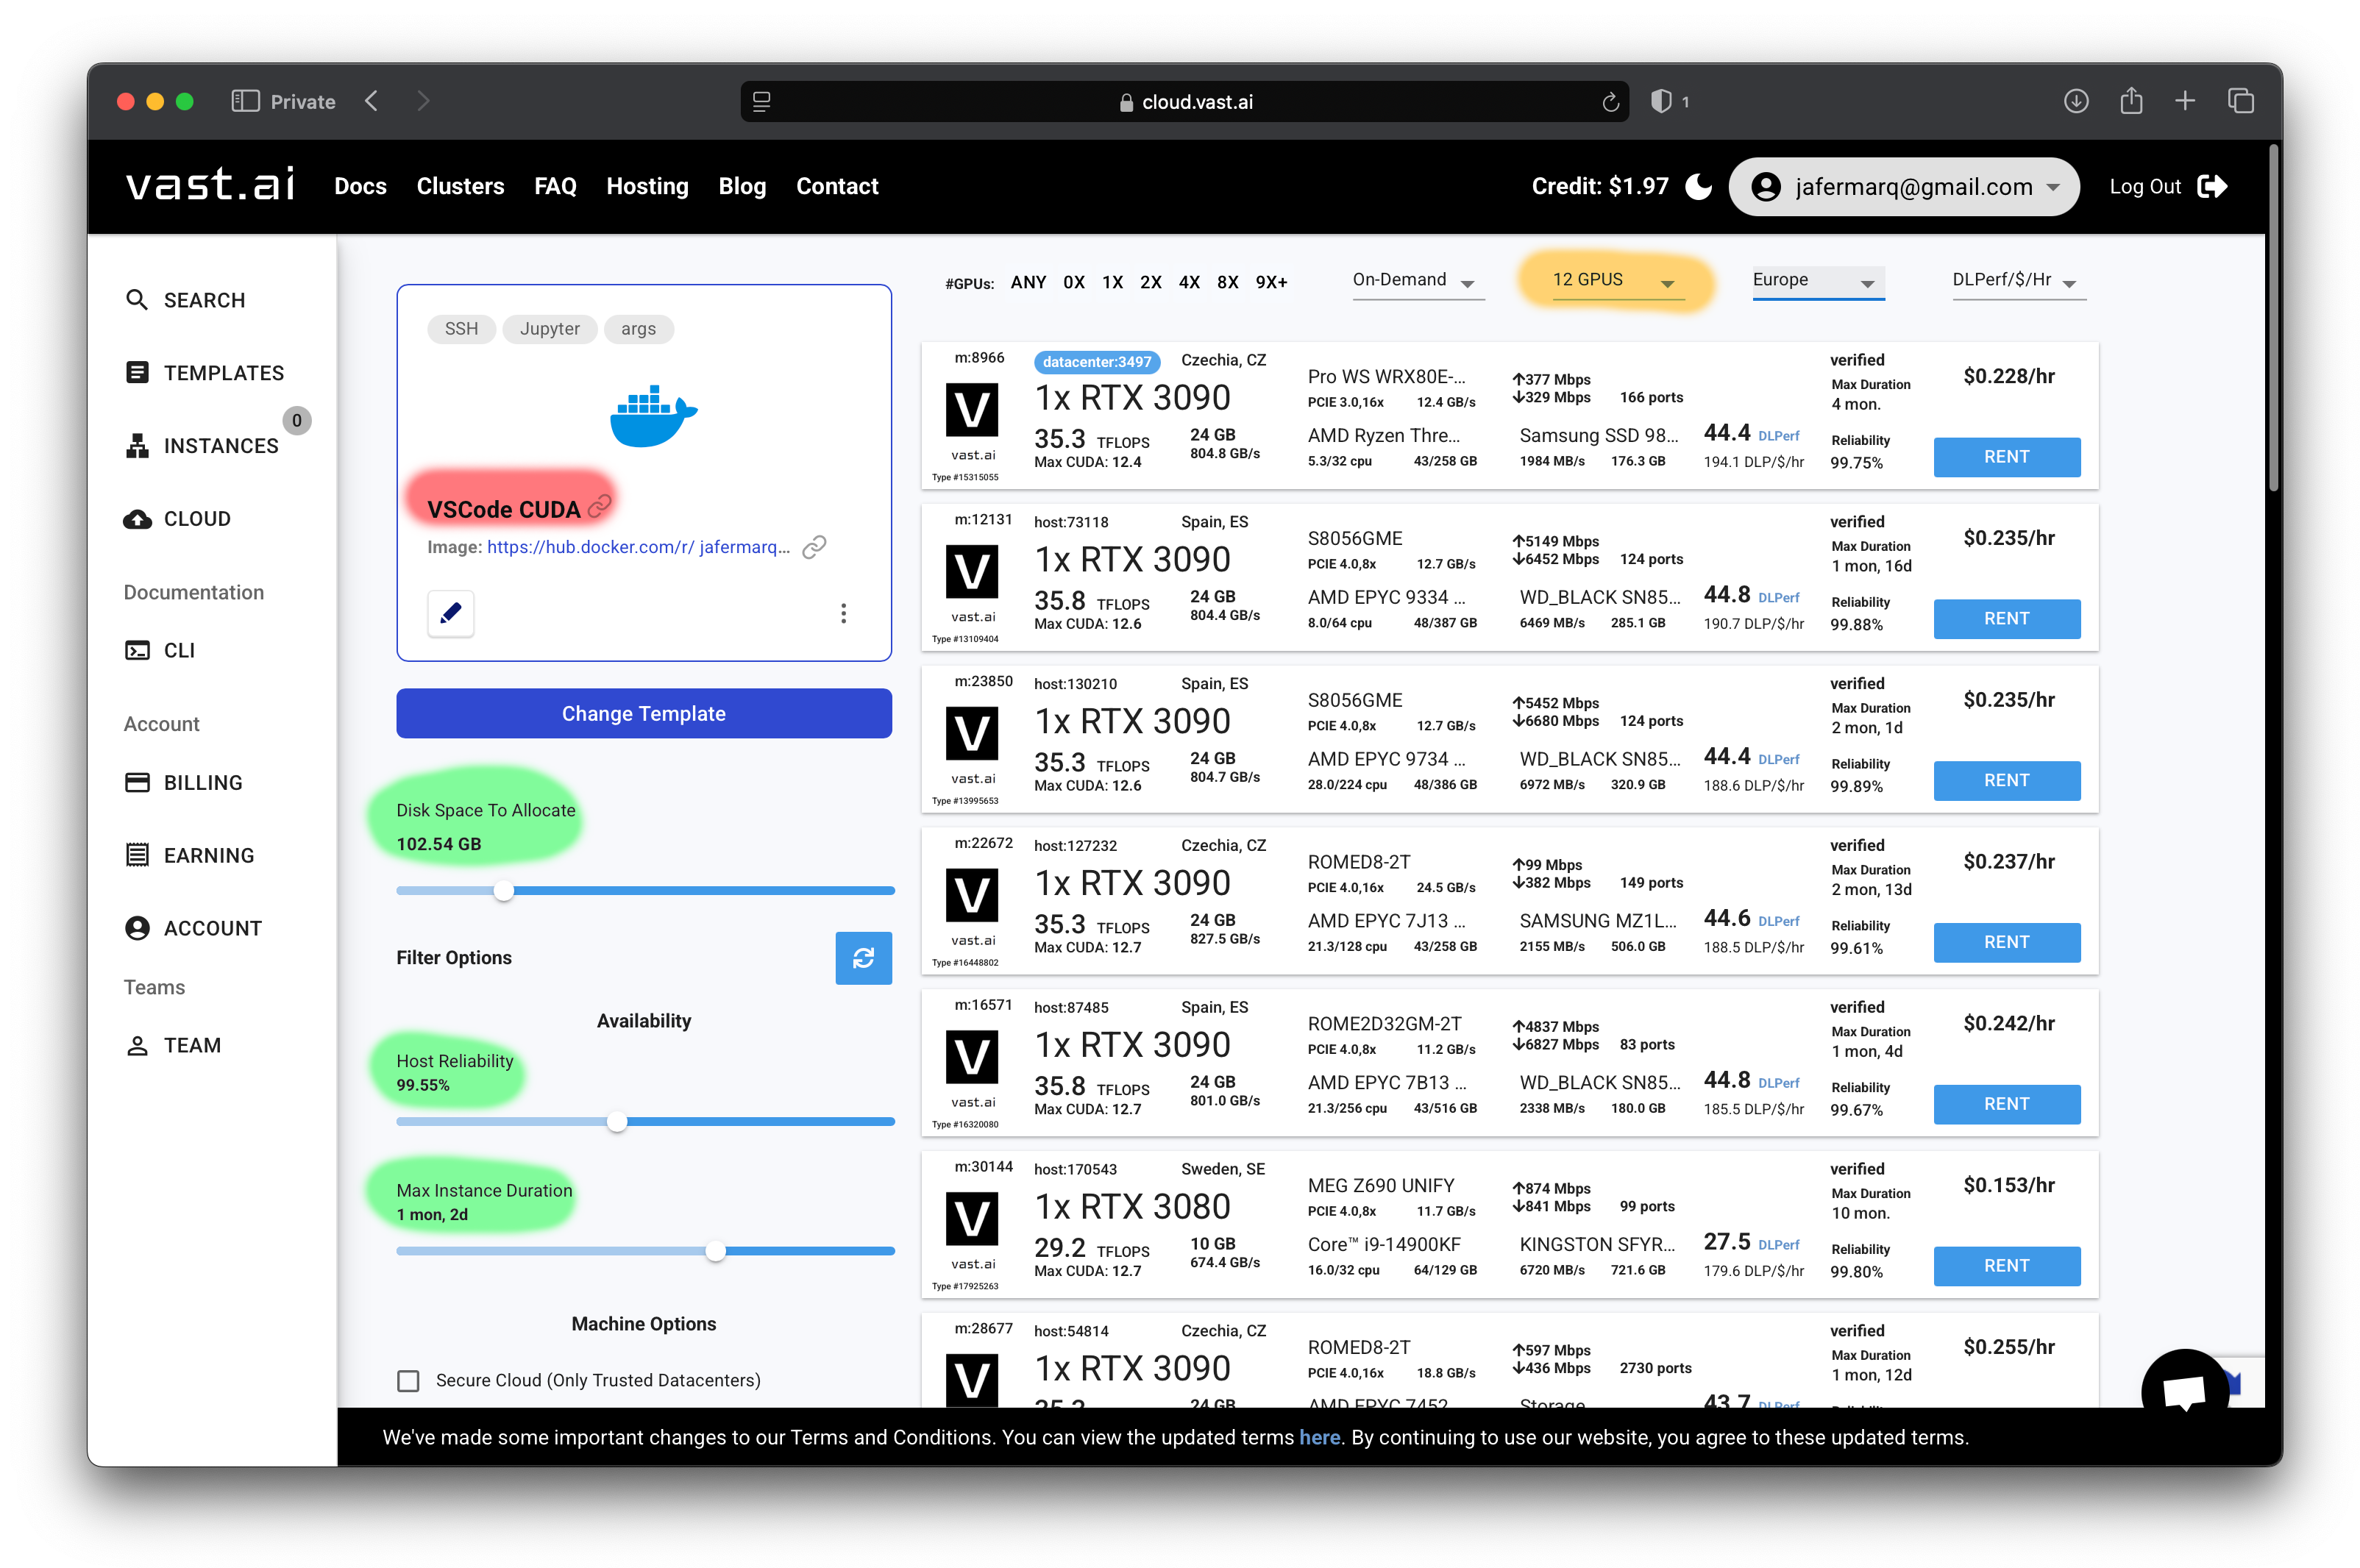
- Then, optionally increase the disk space allocated to anything between 64GB and 100GB, the host reliability to over 99%, and the max instance to approx 2 weeks. For reference, see the shaded areas in green on the screenshot above.
- In vast.ai you have a wide selection of GPUs, from low-end gaming GPUs (e.g. GTX 1050Ti) all the way to the latest data center GPUs (e.g. H200). For this course you likely won’t need more than an RTX 3090. In fact, you might want to choose a low-end GPU (e.g. RTX 3060) for the practicals and use a more powerful GPU later for the assignment when you have all or most of your code ready. Note you can also choose an instance with multiple GPUs. This is great if you want to run your Flower experiments fast. You can filter through all GPUs available using the drop down menu shaded in orange in the screenshot above.
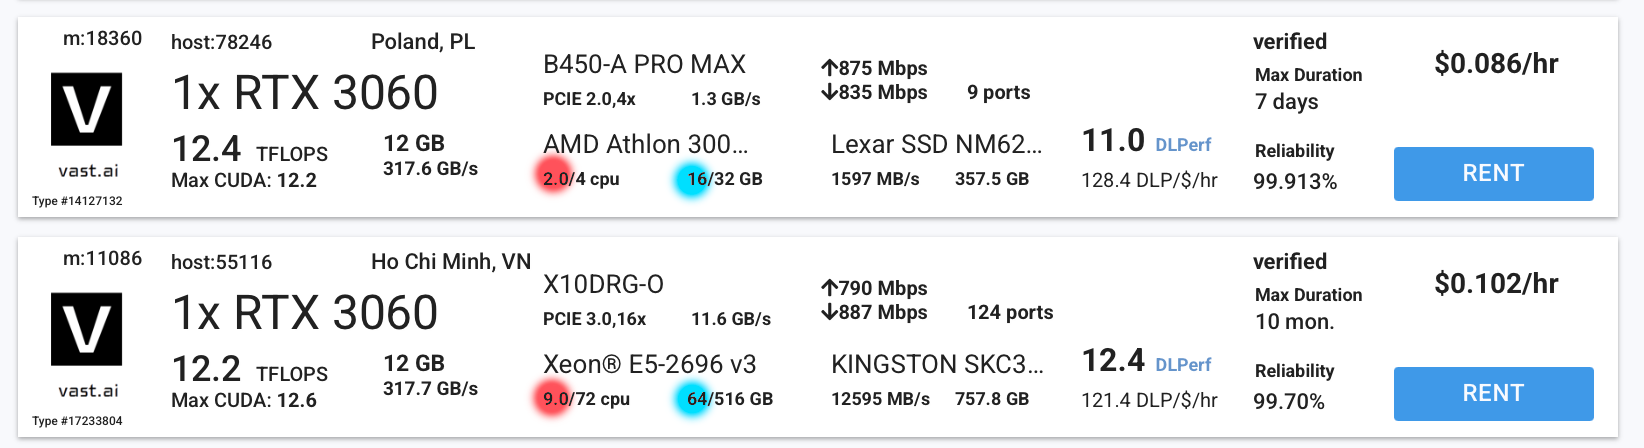
- At a high level instances might seem identical. Below are two instances that we could choose from, both have an RTX 3060 and both cost about $0.1/hour. However, if you look closely you’ll see one has far more CPUs (in red) and RAM (in blue) than the other. Take these specifications into account when choosing your instance. Higher CPU count and RAM amount will give you more headroom to run your Flower simulations.
- To aid with filtering the instances, you can use the panel on the left (as you did earlier). Scroll through it and set:
- Min CUDA Version:
12.6 - Machine Resources:
- CPU Cores: anything between 10-32
- CPU RAM: anything between 32-64
- Min CUDA Version:
- After applying the filters, choose an instance of your liking (e.g. with an RTX 3060/80/90) that has some decent upload/download internet speeds (500Mbps/500Mbps or higher would be ok) or that are geographically close to you and click on
[RENT]🚀
Connecting to your Vast.ai Instance
⚠️ If you don’t stop your instance, you will continue being charged. When the instance is stopped, you’ll still be charged (but at a reduced rate) for the disk space used. All in all, if you want to make the most out of your $ then: (1) stop the instance when you aren’t planning to work on your project anymore; (2) consider downloading the code you wrote to your laptop (so you can reuse it later) and destroy the instance.
- If you have already rented an instance, you should see it in the
INSTANCESpanel. For example, as shown in the screenshot below. Note it is already running (it might take <5mins to be ready from the moment you clicked onRENT). Take note of which buttons stop and destroy your instance. Also note the button on the top left, it shows a detailed breakdown of the running costs associated with your instance (including those when your instance isn’t running) when you hover over it.
-
Transfer the SSH key you previously added to vast.ai to your instance by clicking the icon shown as a key. That’s the icon shown in the screenshot above with an arrow saying “Keys”. A window will pop up, simply click on the plus (
+) button in the “Your SSH Keys” column so the key also appears in the “Instance SSH Keys” column. Then close the window. - To connect via SSH to your instance, you’ll need to find the IP address and hostname. The easiest is by clicking on the
>_icon (see the above screenshot where it saysssh). It will pop up a new window showing you the address to use. It is highlighted in green what you need to copy and use in the next step (note your address will probably be different)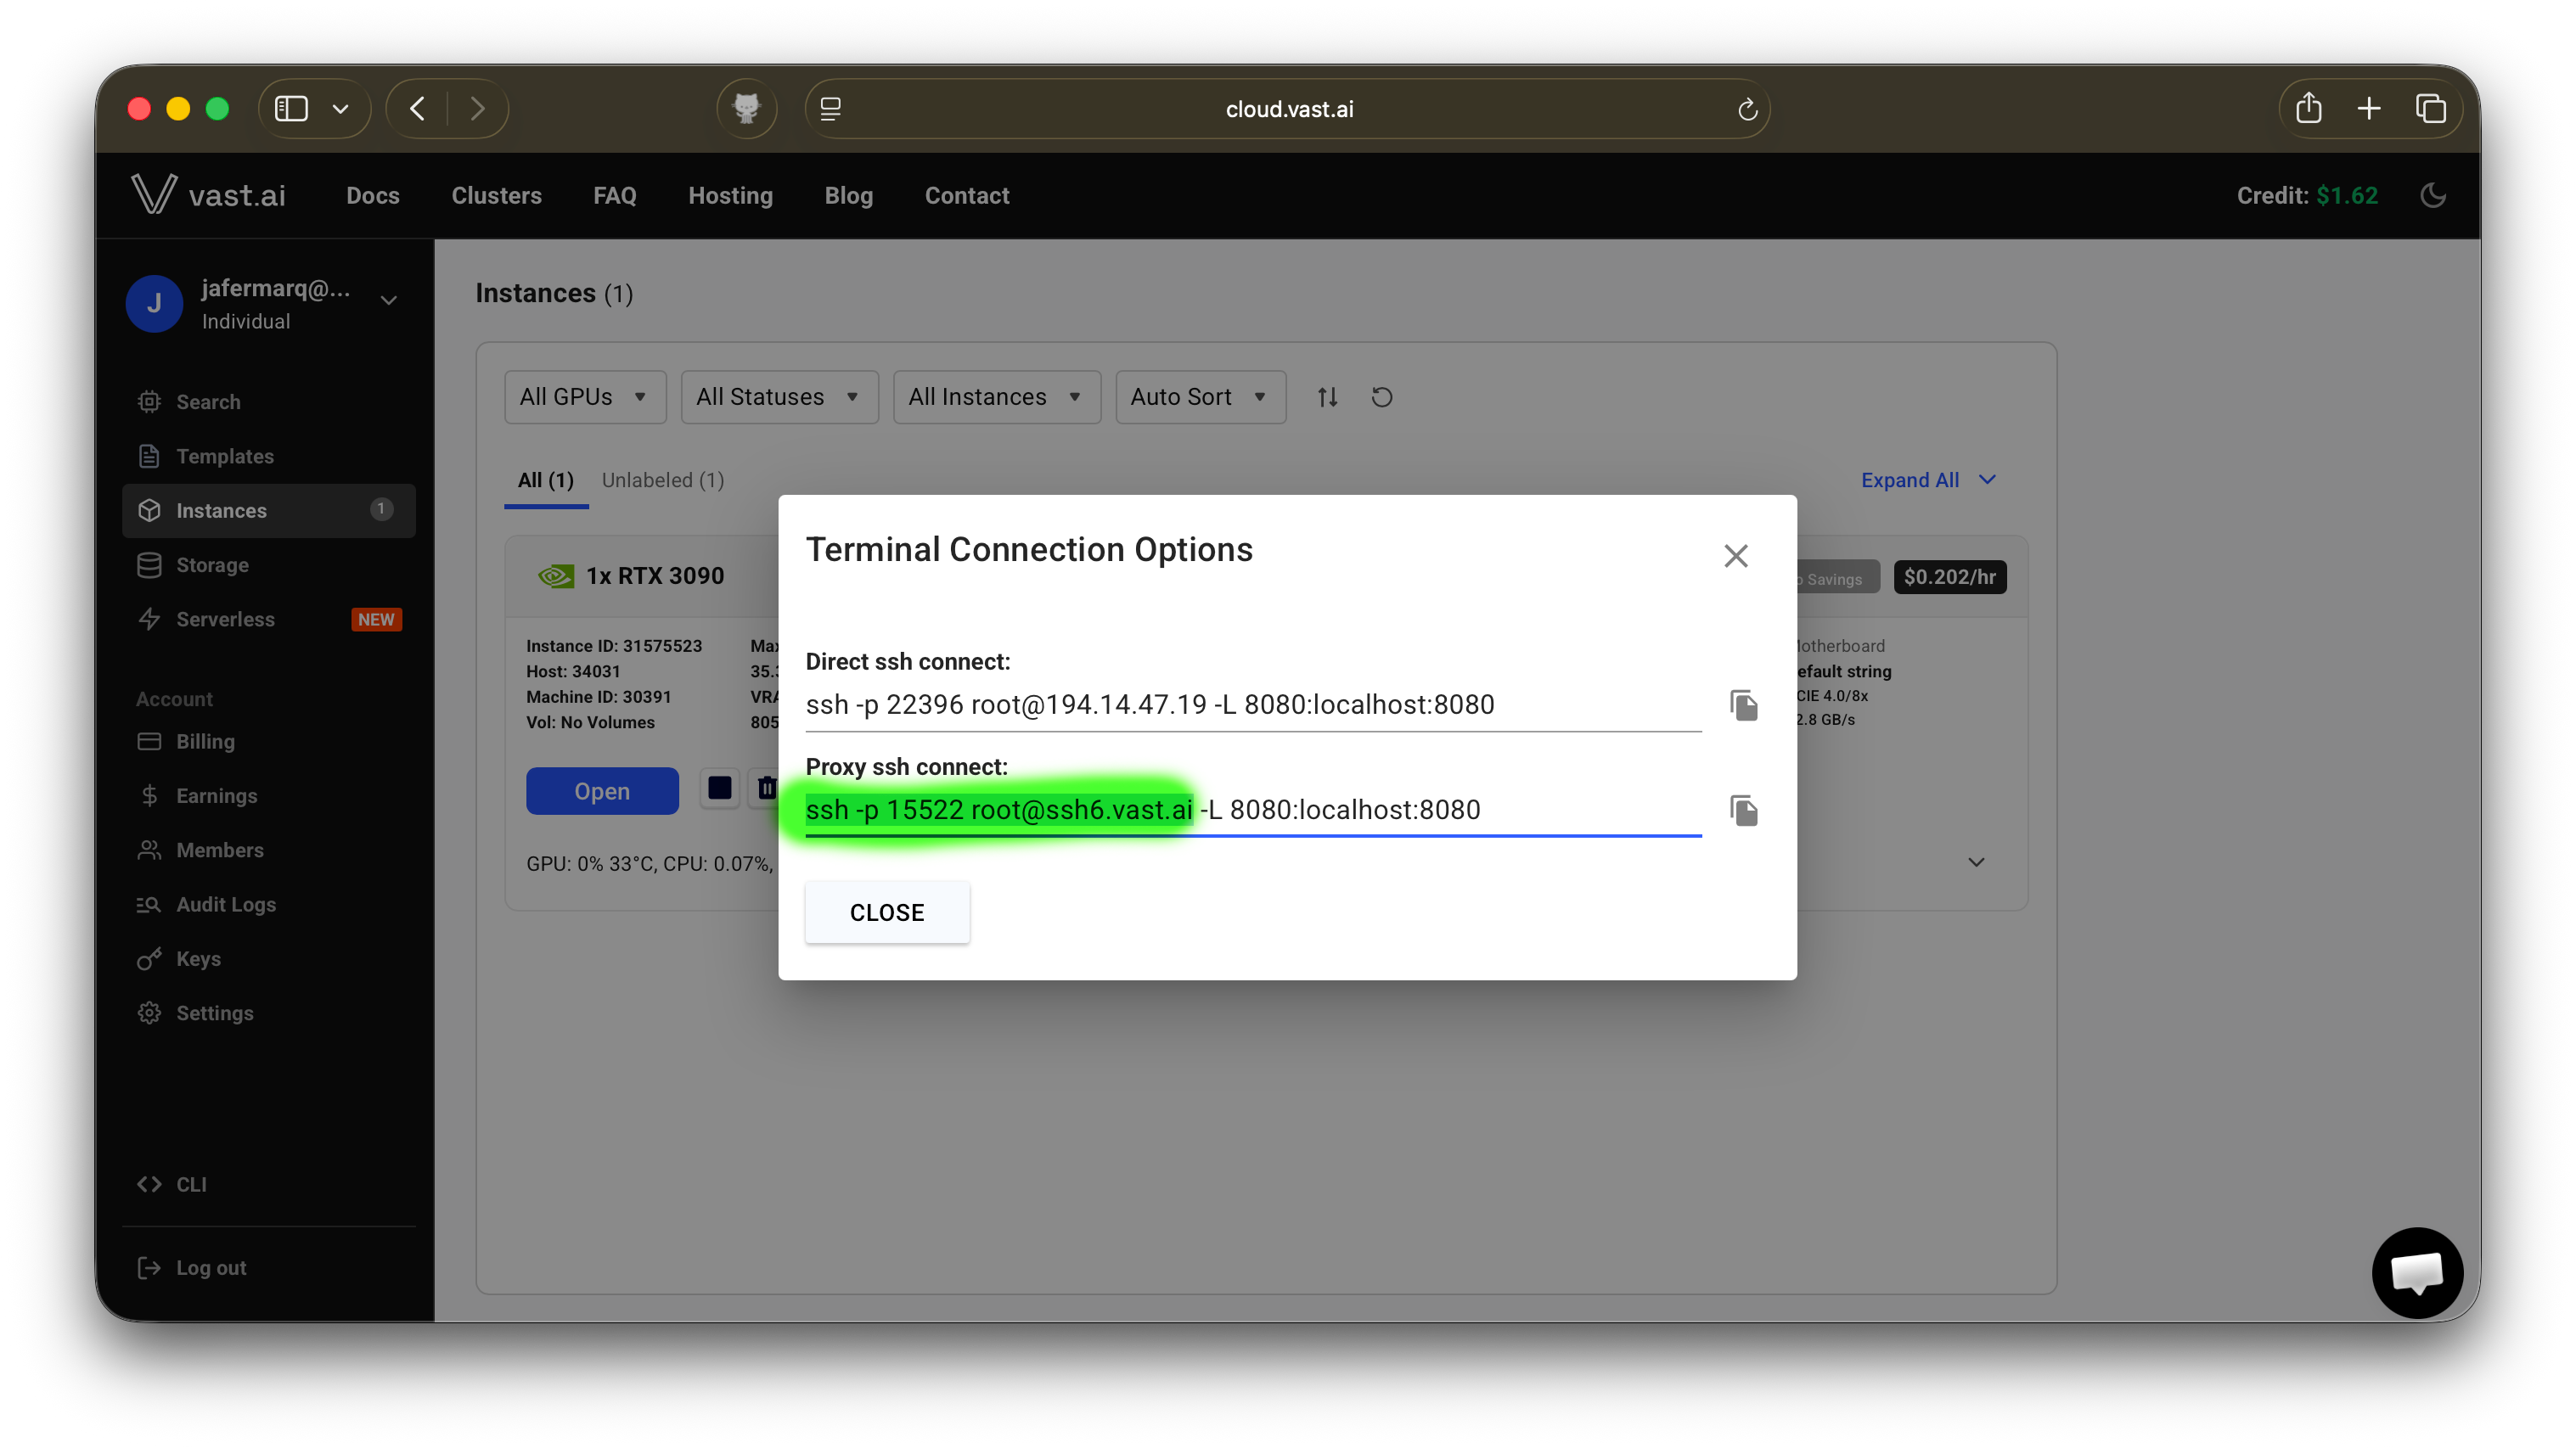
- Open VSCode in your laptop and open a remote SSH connection to your vast.ai instance. Do this by first clicking on the
><icon in the bottom left corner of VSCode. Then click onConnect to Host..., then+ Add New SSH Host...and enter the address you obtained in the previous step. When prompted to select a SSH configuration file choose the path that points to your user directory (e.g./Users/<your-username>/.ssh/config).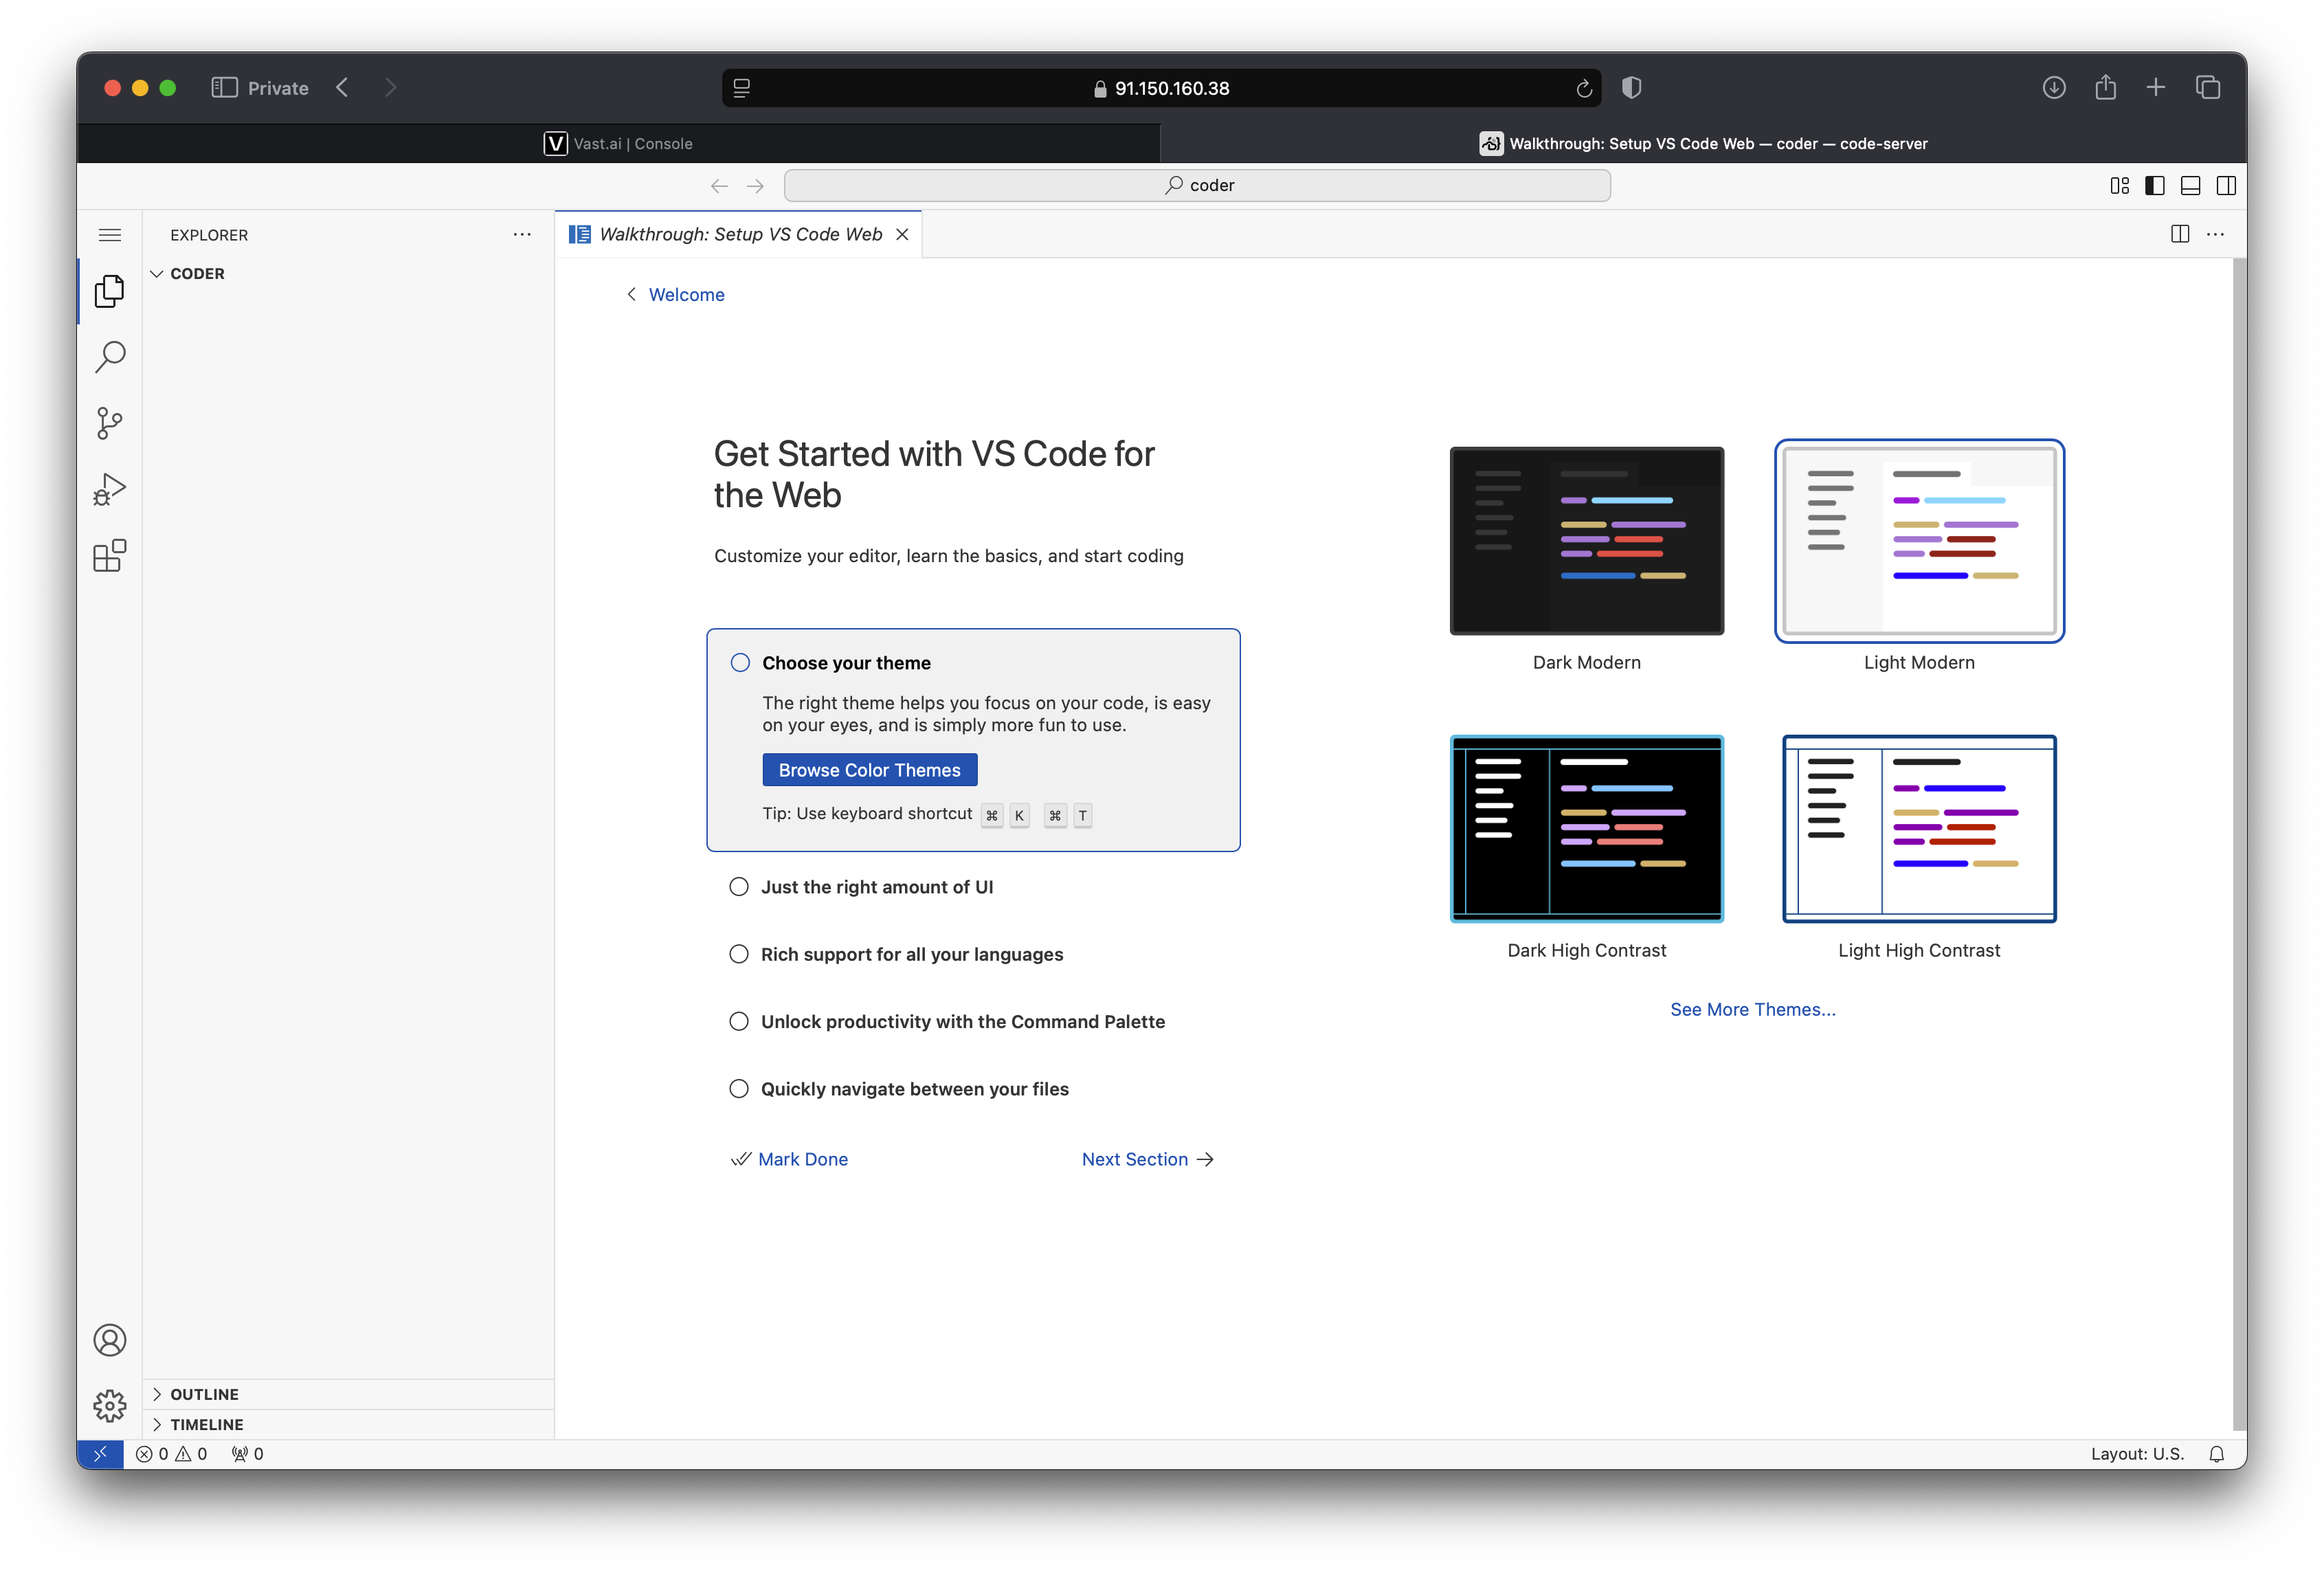
-
After completing the step above, you should be immediately prompted with a notification asking you to connect to the remote instance. If you didn’t see it or you missed it, click on the icon
><again and choose from the list theSSH hostyou added in the previous step. Upon connecting, you’ll be running a totally standard VSCode instance but that’s executing all the commands in the remote vast.ai instance. -
For Practical C or the Final Project, you might want to use your vast.ai instance to run a remote SuperLink. For this it’s important to keep track of the SuperLink’s
FleetAPIandControlAPI. To achieve this you’ll need to customize slightly the default template used: enable ports9092and9093, then click onCreate and Use. Launch a new instance using that template.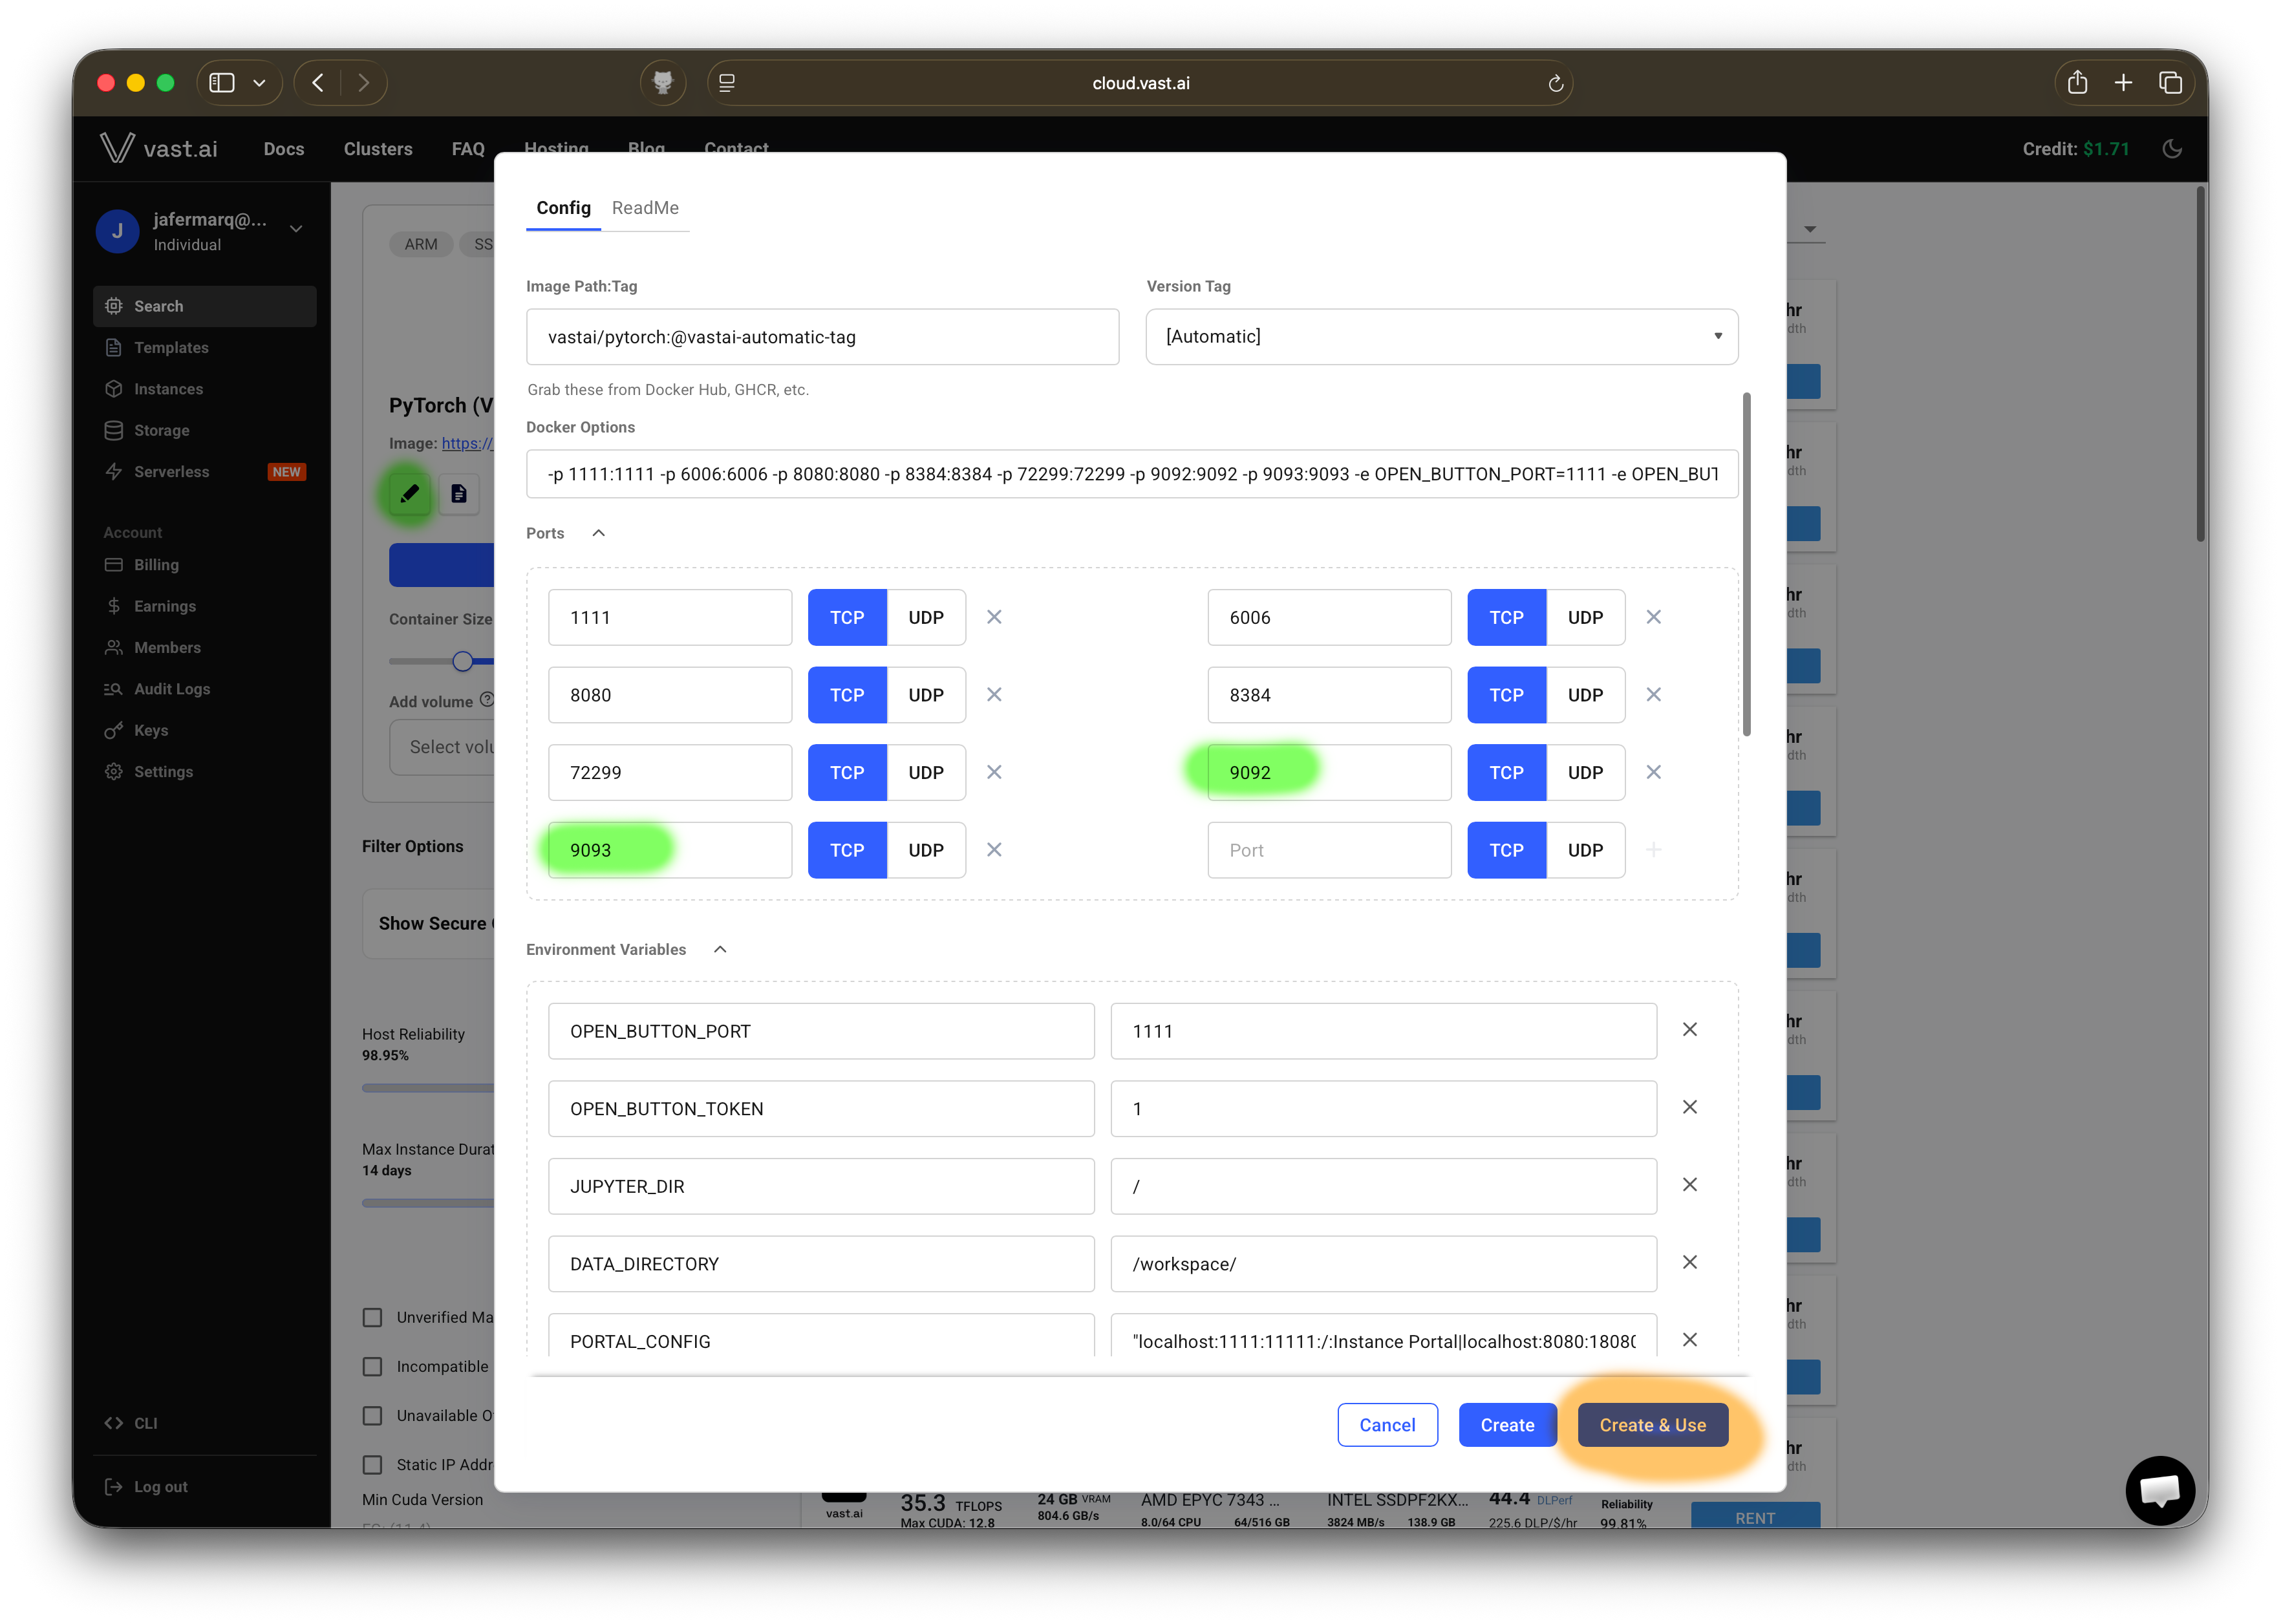
- If you configured your template correctly (enabling ports
9093and9092) you should see these get forwarded when you click in theaddressof your instance (see the first screenshot in this section to find this). For example in this particular case, if aSuperLinkis running in this machine, aSuperNodewould need to use address194.14.47.19:22347to connect to it.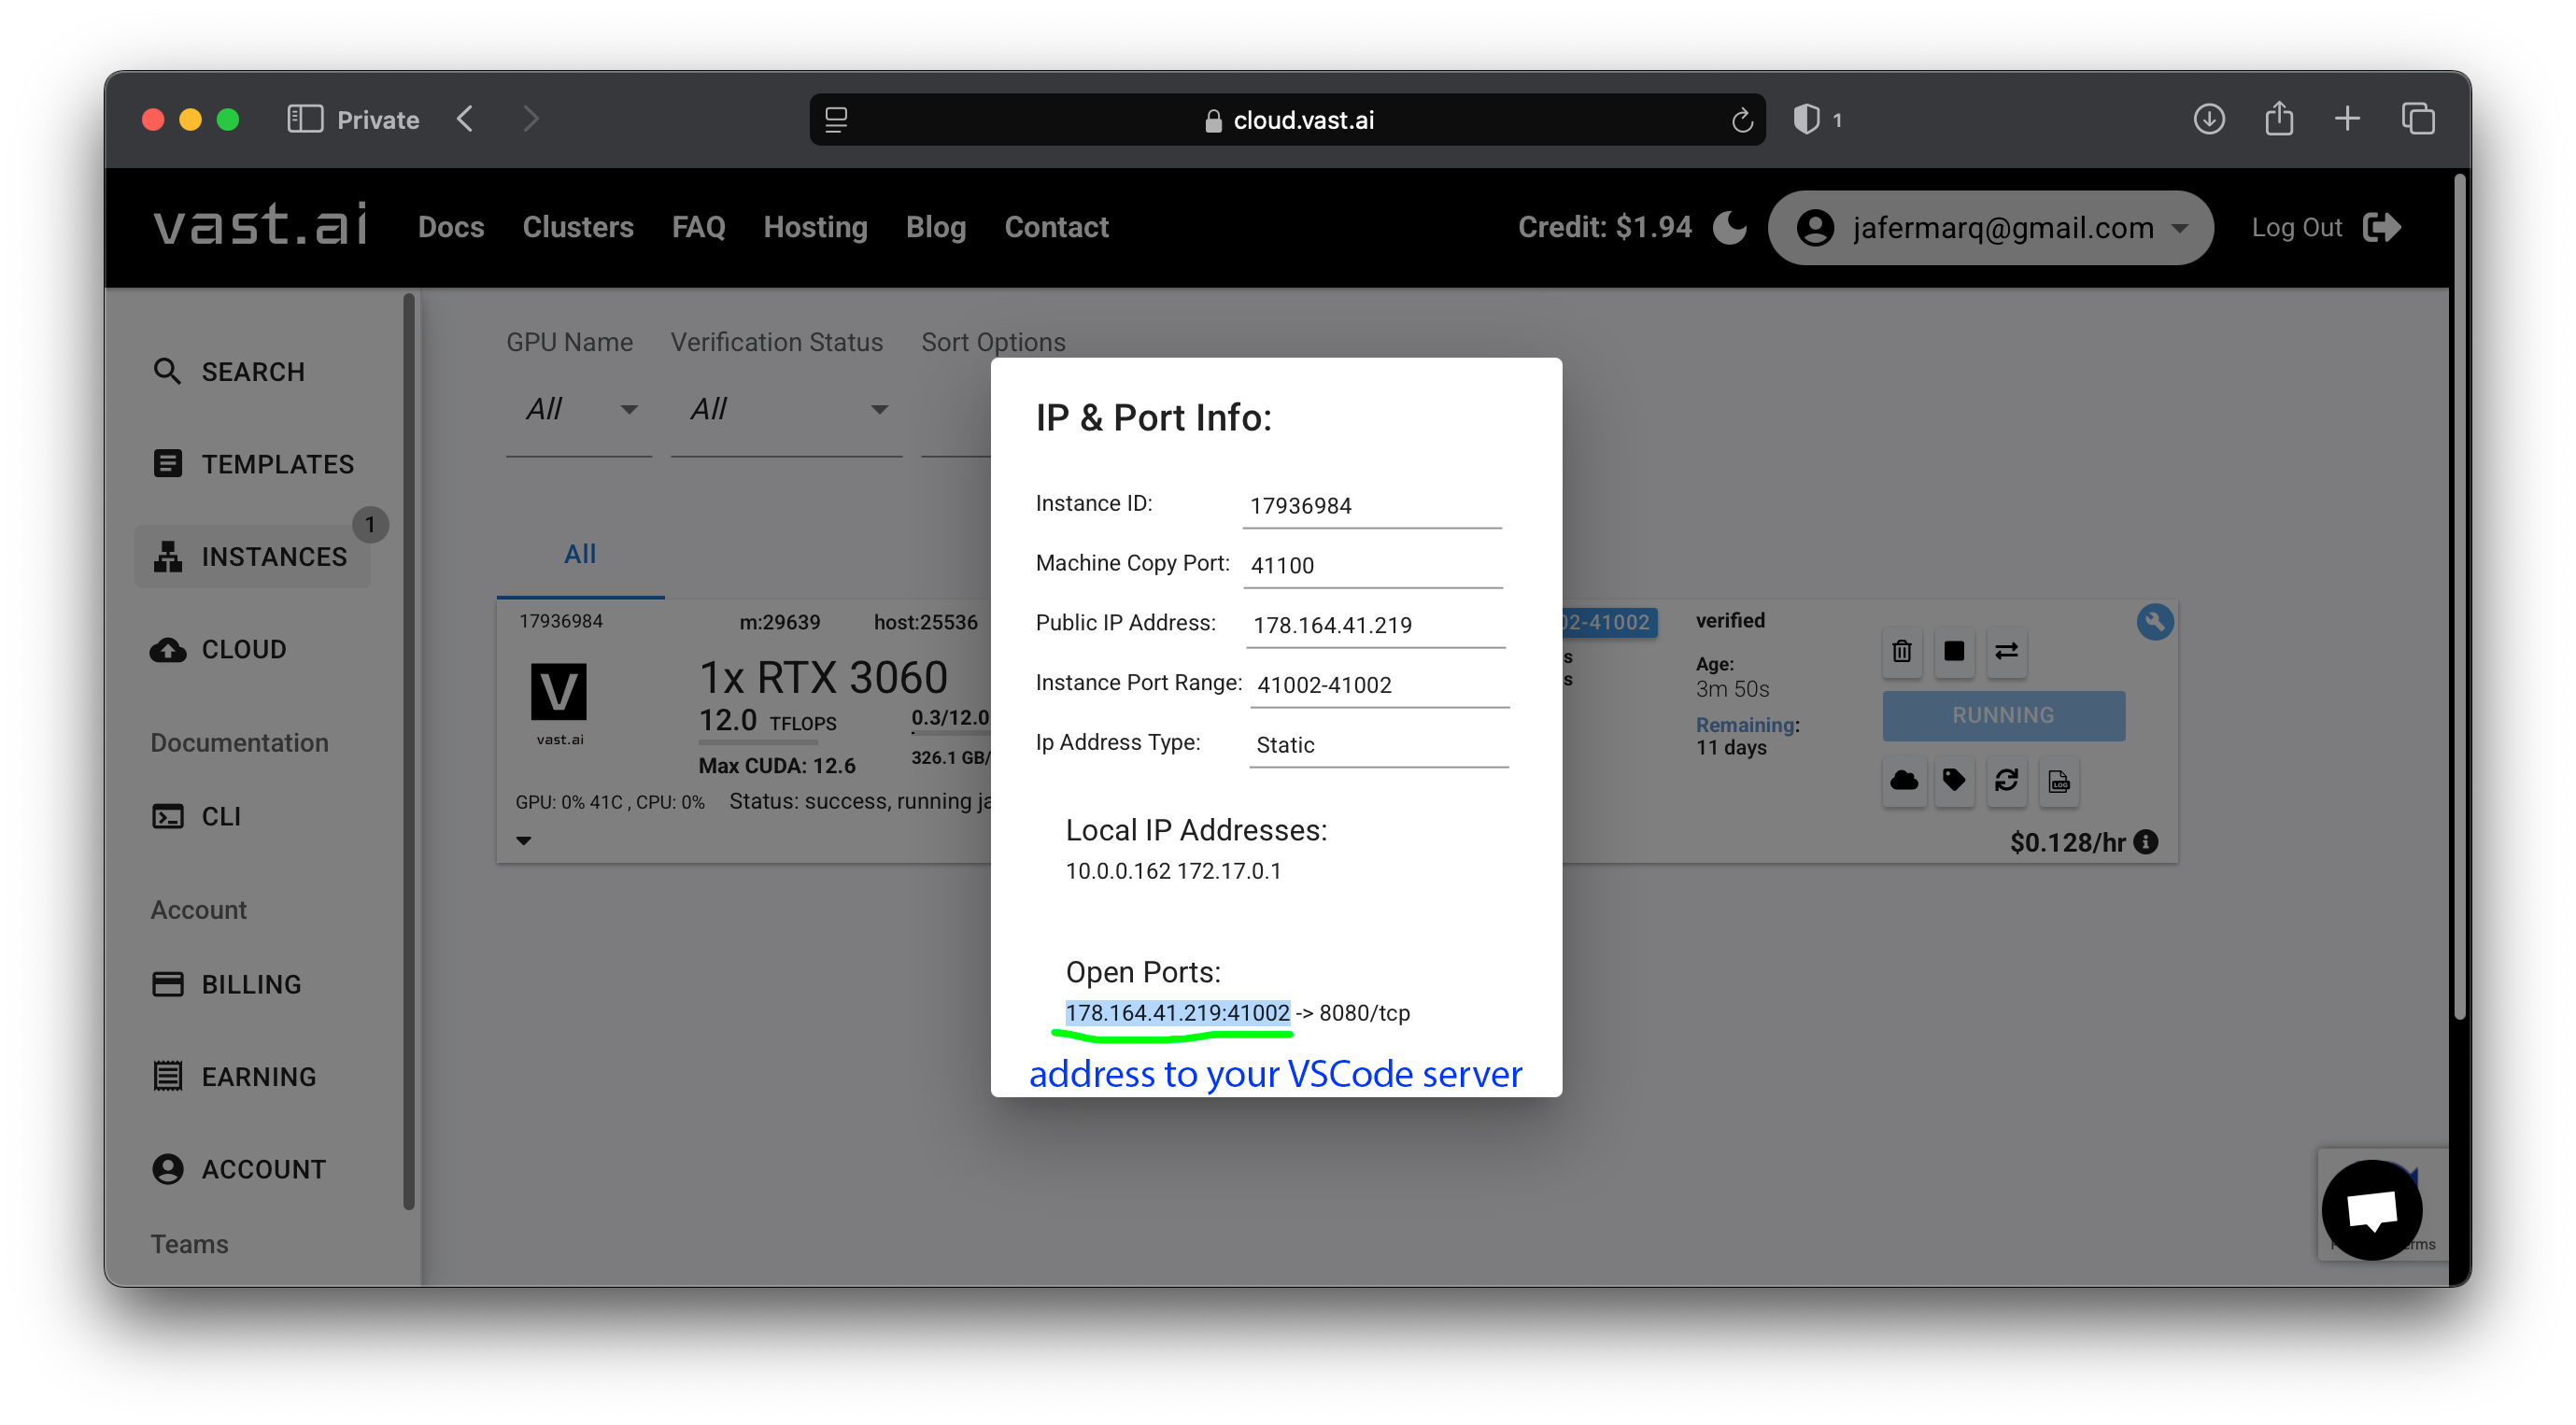
Remember to stop (or even terminate) your instances when you are not using them. Additionally, if you have stopped your instance, others could rent it and (temporarily) prevent you from connecting to it while it’s being used. They won’t have access to your files. In summary, it’s recommended to download your files when you stop your instance (more on this in the next section).
Useful resources
- Flower Framework Documentation
- Flower Simulation Engine
- Flower Deployment Engine Overview
- Flower Deployment Engine Tutorial
- Flower Datasets
Flower Hello World
To start with Flower, all you have to do is to install the flwr package in your terminal. If you are using vast.ai, you can open a terminal and run the command directly (the Python environment will automatically be activated). If you are using your own setup you might want to do this in a new virtual environment (e.g. using Conda or pyenv).
pip install flwr
With Flower installed, you can create your first App. There are several apps available. For now, let’s use the quickstart-pytorch app.
flwr new @flwrlabs/quickstart-pytorch

# You can explore other apps by executing just 'flwr new'
You’ll notice a new directory has appeared with the name quickstart-pytorch. Access it from the terminal, install the dependencies and run the app.
# Enter into the app directory
cd quickstart-pytorch

# Install the app dependencies (i.e. PyTorch etc)
# Inspect the pyproject.toml to see what will be installed
pip install -e .

# Run the app
flwr run .
You can find a detailed walkthrough of the code in the Flower Documentation.
Sending/Retrieving files from a remote VSCode
If you want to download files from your VSCode instance in Vast.ai, you can right-click on them and click on Download. However, this won’t work for directories. The workaround is to first compress the directory into a .zip file and then download that file individually. Let’s see how to do this with the terminal:
# Follow this syntax
zip -r <NAME-FOR-YOUR-ZIP-FILE>.zip path/to/directory/to/compress

# For example if your directory is named `my-app` and is the current directory and
# you want to compress its content into a `myapp_backup.zip`, do:
zip -r myapp_backup.zip my-app/
Then you can download the generated .zip file.
If instead you want to upload files to VSCode, they can be dragged onto the explorer directly. It also works for directories. If you are dragging a .zip file you’ll need to uncompress after uploading it using the terminal like this:
unzip path/to/my/file.zip
Practicals
Practical A
This practical builds on top of the Flower Hello World section above. You'll dive into the code, make some small modifications and run it a few times.
- Complete the Vast.ai setup if you wish to use this platform.
- Complete the
Flower Hello Worldsteps. - Check the files in your Flower App. Can you identify:
- The model being federated and the datasets being used?
- How many nodes are being simulated?
- What’s the aggregation strategy and how is it configured?
- How many rounds of FL will run by default?
- Create a new federation with 20 nodes in your Flower Configuration file (
config.toml), name itsecond-federationand run it withflwr run . second-federation. Do you observe double nodes being sampled now? Learn more about the Flower Configuration. - Add a new configuration value under the
[tool.flwr.app.config]section in your app'spyproject.toml(for example alearning-rate = 0.1that defines the learning rate for theClientApp) and ensure this config value is read when building theClientAppand that is passed to the optimizer. - Run the app overriding the run config. Learn how to do this by reading the help message you get from
flwr run --help. - Create a Jupyter Notebook in your VSCode and visualize the partitions created by your Flower App. As dataset downloading and partitioning is done with Flower Datasets, you may get inspiration from the visualization tutorial.
Practical B
In this practical you will customize further your Flower app by replacing the dataset and creating a new Flower strategy that adds useful functionality to your ServerApp.
- Create a new app again using the
flwr newand PyTorch template, give it any name you want. - Replace the default dataset with
FashionMNIST. Take a look at its repository on Huggingface Datasets. To use it in your Flower App you’ll need to:- Update the dataset preparation (see the
load_datafunction intask.py) - Update the keys used to access the elements in the batch (e.g., in
trainandtest) - Update the model so it’s ready to work with 28x28 greyscale images as opposed to RGB 32x32 (which is what CIFAR-10 uses)
- Update the dataset preparation (see the
- Run the code. Is the loss going down?
- Is your app making use of the GPU?
- You can check by opening a second terminal and running the command
watch -n 1 nvidia-smi. - Read the Flower Documentation to know how to set the CPU/GPU resources available to each
ClientApp.
- You can check by opening a second terminal and running the command
- Add a callback to your
ServerAppstrategy:- Introduce a callback to the strategy, so the
accuracyis also aggregated and displayed. You may follow how theServerAppin the pytorch-quickstart example does it. - Adjust the hyperparameters so the performance goes to over 70%.
- (optional) Get the performance to over 85%.
- Introduce a callback to the strategy, so the
- Create a custom strategy for your
ServerAppthat enables it to do the following.- Creates a directory for the run with the format:
outputs/<current-date-and-time>/and saves to it. - Saves the evaluate metrics each round to a JSON. This is important so you can complete practical C.
- (optional) Save a checkpoint of the global model each time a new best is found.
- (optional) Logs metrics to Weights&Biases (or equivalent).
- Creates a directory for the run with the format:
For the last few points in this practical you may use the advanced-pytorch example for inspiration.
Practical C
In this practical you will extend the Flower App you created in Practical-B and you'll analyze how it performs under different scenarios of varying complexity (i.e. different number of nodes, increasingly heterogeneous data distributions).
- Copy the app created in Practical-B and give it a different name.
- Update the code so that from the config (i.e. via
--run-config) you can:- Change the partitioner: to
DirichletPartitionerorPathologicalPartitioner. - Change parameterization of the partitioner (e.g., alpha in
DirichletPartitionerornum_classes_per_partitionforPathologicalPartitioner).
- Change the partitioner: to
- Run experiments and analysis when:
- Increasing the number of nodes in the federation (you may want to create several federations in your
pyproject.toml). - Changing
fraction_train. - Using different partitioners and their parameterization.
- Increasing the number of nodes in the federation (you may want to create several federations in your
- Create a PDF report describing: (1) the experiments you executed; and (2) plots illustrating the Federated model's performance across rounds for each scenario considered.
- Submit a single ZIP file to ADI (activity: Federated Learning Assignment). This ZIP should contain your report, all source code, and any results (including code like Jupyter Notebooks used to generate plots).
Adjust hyperparameters to the best of your ability. For example, highly non-IID setups might need smaller learning rates or more rounds to reach the same performance as (unrealistic) IID scenarios. Try your best. Create a short report showing plots for how federated accuracy/loss perform when varying parameters across the above dimensions.
Final Project
For the final project, you will design and analyze your own Federated AI setup using a model and dataset of your choice, similar to the process in Practical C. With access to GPUs, you are encouraged to use larger models than those in previous practicals. You may use either Flower's Simulation Engine or Deployment Engine. Below are some project ideas, though you are welcoming to propose others. If you choose a topic not listed here, please consult with me during class first.
- Build a medical FL setup using a dataset from MedMNIST (e.g. OrganAMNIST or ChestMNIST).
- Take a pretrained model (e.g., on ImageNet) and federate its fine-tuning to adapt it to a new task. You may use the Federated Fine-tuning of a ViT example for inspiration. Additionally, evaluate the communication overhead of this federation using Flower mods.
- Federate the training of a speech classification model, for instance using the Speech Commands dataset. Consider transforming audio clips into 2D representations to perform FL on images rather than raw audio waveforms. This notebook demonstrates how to download, partition, and pre-process the dataset.
- Construct a federation of IoT devices using Flower's Deployment Engine. Write a report describing how you built the federation and the experiments you ran.
- Using Flower's Deployment Engine with Docker (see documentation), implement a tool to monitor system resources for each container (e.g., CPU/RAM/IO) as well as application-level metrics (e.g., accuracy, loss). You may use tools like Grafana or others of your choice.
- Enhance this Flower App, which trains a vision model to classify satellite images from Sentinel-2. Modify the model architecture and federation strategy to achieve accuracy as close to 90% as possible, assuming a federation of 12 satellites (clients). You may use a pre-trained model, but you must justify your choice.
Submission Guidelines. While evaluation criteria may vary slightly by project type, all submissions must include: (1) your complete code, (2) a PDF report of your analysis, and (3) a README explaining how to execute your code via flwr run. Compress these files into a single ZIP archive and upload it to ADI (under 'Federated Learning Assignment'). Note that I will be running your code to verify it.